Curried Bean Bowl (Dorm Friendly!)

I wasn’t sure what to call this.

I think I have  a problem with that….  like, naming recipes and all that jazz? It’s so confusing because I really just like to throw stuff together and NOSHHHHHH before I can think of something clever to call it.

Oh well, Curried bean bowl it is!


This bowl is simple, delicious and quick to make when you have long days and the hanger strikes as you pull your sick bicycle into your residence hall bike rack after a long freakin’ day of classes and exercise or vegetation. Also super easy to make when the only things you have available to you are a microwave and a mini fridge.

Can you tell that that’s how my days have been going these past few weeks?
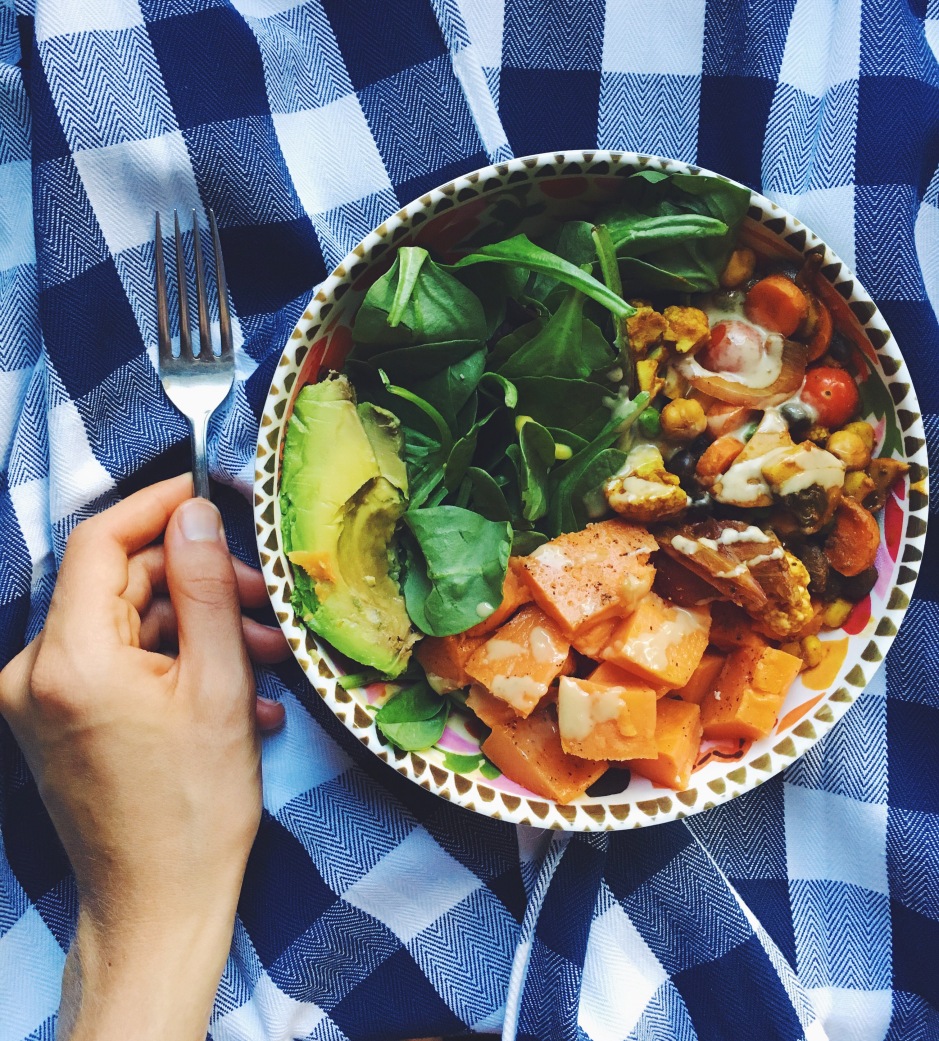

Curried Bean Bowl

serves: 1-2 (pending on your hunger)
Processed with VSCO with f2 preset
Serious yumminess.
Prep time: 10 minutes
Cook time: 10 minutes

Ingredients

  • 3/4 cup organic chickpeas and black beans, rinsed
  • 1/2 to full sweet potato
  • 1/2 tablespoon curry powder
  • 1/4 tablespoon chili powder
  • 1/4 tablespoon cumin
  • 1/4 tablespoon turmeric
  • 1/2 teaspoon ginger
  • Pinch of sea salt and black pepper
  • 2 1/2 cups mixed veggies (I used carrots, peas, corn, onion, cauliflower, mushrooms, and tomatoes)
  • 1 1/2 cups fresh spinach
  • 1/2 cup tomato sauce

*Optional toppings: nutritional yeast, sriracha, avocado and tahini. Optional, once again. BUT HIGHLY RECOMMENDED!


  1. Pierce your sweet potato with a fork and microwave on high for 5-6 minutes, depending on size.
  2. Place beans, spices, and raw vegetables into a bowl.
  3. Add tomato sauce to the mixture and stir away!
  4. Once the potato is cooked, place bean and veggie mixture into the microwave for 2 1/2 minutes.
  5. As this is “cooking”, deskin potato and chop that baby up.
  6. Throw your greens and potato into a bowl, and once the bean mixture is done, place that in the bowl as well.
  7. NOW TOP AWAY, GRAB A FORK AND SMASH!


Cheap, easy and damn delicious. Just the way we broke college kids like it.

Caramel Coconut Cashew Bites

I’m a huge fan of energy bites.

I used to be so, I don’t know, LAZY about my snacks! Sure, larabars are fantastic, but homemade snacks are one, an accomplishment and two, a great way to save money when in a pinch for a snack!

Now that I’ve started really working to make a lot of my own foods to ensure ingredients and sugars I would want to eat, flavors and experimenting with them has thrown me for a loop. I LOOOOOVE trying out new things, and these were a total accident after I messed up a batch of cashew butter.

IMG_2042.JPG

The great thing about energy bites is that one or two satisfies you to pump out your workout or get through till the next meal. They’re definitely become a staple in my diet, and of course in my weekly prepping on Sunday afternoons.


Caramel Coconut Cashew Bites

makes 12 bites

prep time: 5 minutes

cook time: 10 minutes


Ingredients

  • 1.5 Cup raw cashews, unsalted, and soaked for ten minutes
  • 2 TBSP. warm water
  • 15 pitted dates, soaked
  • 1 tsp. caramel extract
  • 3 TBSP. coconut flour
  • Pinch of sea salt

  1. Begin by using a high speed blender or food processor to cream the cashews. This should create a smooth, ball of cashew goodness.
  2. Add the dates in, as well as the water and let the two ingredients combine.
  3. After these have combined, add the caramel extract, coconut flour by a tablespoon each time, and the sea salt. Let these all blend together.
  4. Remove the batter from the blender and roll into twelve mini balls. These should be around a tablespoon of the batter.
  5. Refrigerate or freeze and enjoy the heck out of these babies!

Easy Peasy Baked Falafel

I had my first falafel only a few weeks ago.

I waited wayyyyy too long to try these babies out, and let me just say, I have now craved falafels every day for the weeks following. Yesterday morning I ate breakfast and then a cooking bug exploded inside of me before I left for my run, and the falafel was born.

I took a gander at some recipes on Pinterest to try and get a feel for what most falafels consisted of- and some were full of oils and had to be fried. Granted, yes, falafels are great when they’re super crispy and indulgent; but I’m not huge on fried things. Therefore, I went out to make some baked falafel.

Chickpeas are the way to go for anything, and now that I’ve discovered how magnificent tahini is, we had to throw that baby in as well. I used my favorite blend of baby spinach and kale greens, along with my favorite spices and a garlic kick I really enjoyed.

File_000.png

I’m also a fan of oat flours to keep it gluten free. I don’t have a gluten problem, but I like the closest things to nature as possible- so how could you go wrong with a little homemade oat flour to create them?

My nutri-bullet broke a few weeks ago (started smoking as I made energy bites; very hard day for me) so I used a regular blender, and I have to say, it wasn’t too bad! I’d recommend a food processor though.

File_001.png

I was so excited when I had them in the oven, I was taking snapchat stories singing to them…. sometimes, I frighten myself.


Easy Peasy Baked FalafelFile_001

makes: 11-12 patties

Bake time: 18-20 min


Ingredients:

  • 1 15.5 oz can organic chickpeas, rinsed
  • 2.5 C. spinach and kale blend
  • 2 TBSP. minced garlic
  • A pinch of sea salt and black pepper
  • 1 tsp. ground cumin
  • 1 tsp. garlic powder
  • 1/4 C. cilantro
  • .5 TBSP. Lemon juice
  • 3.5 TBSP. tahini
  • 3.5 TBSP. rolled oats (ground into flour)
  • 1 TBSP. water (if needed)


Instructions:

  1. Preheat oven to 350 degrees F. Use a cookie sheet lined with parchment paper to bake the falafel once the “batter” is ready.
  2. Combine chickpeas, greens, garlic, spices, lemon juice and tahini into a food processor until just mixed. You want the combination to be slightly chunky, and not creamy like hummus. Because then, you have made hummus. Not a falafel.
  3. After the mixture is ready, move the combo into a small mixing bowl. At this point, you can add more spices if you like.
  4. Start by stirring in a small amount of the flour to the mix, slowly combining the two. Continue this process until all the flour has been added to the falafel mixture.
  5. Begin taking small amounts of the mixture into your hands and roll it into a ball. It will be a little sticky, so you may need a small amount of flour to work with. These balls should be about a tablespoon and a half to two tablespoons.
  6. Press the balls lightly onto the parchment paper to create a patty. Once finished, sprinkle extra pepper on top.
  7. Bake for about 9-10 minutes and then gently flip the patty onto the other side to brown both. Bake for another 9-10 minutes.
  8. Let the falafels cool for 10-20 minutes and enjoy! Serve anyway you like!

Processed with VSCO with f2 preset

Chia Oat Pancakes

I love pancakes to an extremity that I’m sure most people don’t understand. When I was younger, I was obsessed with fluffy, buttery pancakes drowned in mass amounts of Aunt Jemima syrup. And then as I got a little older, strawberry crepes were a go to whenever we went out.

I think it all stemmed from my Saturday mornings with my dad in the kitchen. When I was little, we’d sit in the kitchen and whip up a box recipe and go crazy. I always looked forward to that, and that’s when I slightly fell in love.

IMG_3560

Now that I realize the difference between a homemade and boxed pancake that was loaded with nastys, I’ve become even more involved with this lovely little breakfast. I’ve swapped out my weird maple syrups for all natural, pure. No cups of sugar or white flours to be seen. Just a good ol’ flapjack, made from the best of the best.

I love making oat flour so I decided to throw that in there with a little bit of coconut flour to make the batter. It’s super simple, and these are ingredients I almost always am relying on, so how could I turn away from them for one of my favorites?

IMG_3558.JPG

From there on, I threw in chia seeds for some extra energy and to help bring a little difference to the traditional batter. I haven’t used whit chia yet, so I went for the dark seed, which is what I have at home…

These took a slight bit longer to cook, but they were chewy, pretty fluffy and DELISH!


Chia Oat PancakesIMG_3572.JPG

serves: 1, makes 6 pancakes


Ingredients:
1/2 C. rolled oats, ground

2 TBSP. coconut flour                               1/4-1/3C. water  & 1/4C. nutmilk

1 tsp. baking powder                                 1 tsp. cinnamon

1 tsp. maple extract                                    1/2 TBSP. chia seed

1 egg white                                                     1 TBSP. coconut oil, melted


  1. Melt coconut oil onto a frying pan
  2. Add in ingredients starting with the flours, adding them in order and stirring until mixed.
  3. Let the mixture sit for a few minutes and have the pan heat up.
  4. Start spooning the batter onto the pan and let the pancake cook until browned.
  5. Once all the batter is used, top with what you like! I used almond butter, granola and fruit!
  6. Enjoy!

IMG_3563.JPG

Ooey Gooey Banana Bread

Ripe bananas. Like really ripe bananas.

That’s what I came home to when returning from Spring Break, and I knew exactly what I was gonna make.

BANANA BREAD.

1698424_200x130

Sure, sure I could have just frozen them like most bananas and downed them as dessert or a smoothie, but I felt a banana bread inkling growing in my taste buds, so I sat down, found a base and went crazy.

Best part? No sugar. No gluten. Vegan. No oil.

IMG_3314

Basically a stripped recipe to make this one heck of a natural bread that will satisfy your cravings for something sweet, while being King of the healthy world. Just kidding, maybe not King. Close enough though.

I started first thinking I wanted to try a vegan bread. The last time I tried, nooooot super successful. So this time, I was determined to make it work. And then, as I began going, my head starting spinning with exchanges and I got the most moist, delicious banana bread I’ve ever made. Even Grandma Lois loved it…. that’s how you know we’ve made it!


Ooooooeeey Gooeeyyy Banana Bread

Makes: one loaf              

Prep time: 15 min, cook time: 55-60 min   


V,GF, and Oil free


Ingredients:

1 3/4 Rolled Oats (ground for flour)                               1/4 nut milk (I used Califia Farms)

2 overly ripe bananas                                                         Dash of cinnamon and sea salt

1 tsp. vanilla and maple extracts                                    1/3 unsweetened applesauce

1 tsp. baking soda                                                                 1/2 C. pure maple syrup

1 1/2 Flax Seed (milled)


Instructions:

  1. Preheat your oven to 325 degrees F.
  2. Start by creating your flax egg. This should be the milled flax seed with 3 TBSP warm water. Let sit until a sticky consistency.
  3. In a large bowl, combine the maple syrup and apple sauce until the mixture is one. Add in your ripe bananas by smashing and stirring them. Clumps of banana are okay!
  4. Next, mix in the extracts, salt, cinnamon, nut milk and baking soda. Combining all ingredient together.
  5. At this point, add in your flax egg and give it one more stir.
  6. By spoonfuls, slowly mix in the oat flour you created until the entire mixture is “just mixed”.
  7. Add the mixture, top with a sprinkle of raw oats to a greased bread pan and bake for 55-60 min.
  8. Let cool for 5-10 minutes, and then enjoy!

This can be kept out for 2-3 days, or refrigerated for up to a week!

IMG_3364.JPG


Banana Bread Muffie Cups

Muffies. Bread in a cup. Muffin. Whatever you call ’em, you know that they’re damn good.

I’ve always liked muffins quite a bit, and lately, they’ve been super helpful for snackin’ and quick add-ons to breakfast when I’m in a hurry. But a lot of packaged muffins are chocked full of nasty ingredients, sugar-loaded, and plain gross. I figured, it’s time to bring out my own muffins to supply my family with while we trudge through the week.

I started simple, taking minimal ingredients that I love and flavors to match so that I wasn’t creating some random muffin that tasted funky at first bite. They ended up being almost vegan, and gluten free! What a plus!

IMG_0849.JPG

I love using oats, but I didn’t necessarily want the grittiness of whole oats in these muffins. Therefore, I turned my Nutri-bullet on, and threw in some rolled oats to make the flour for the recipe. And since I really like the subtle coconut taste, I added some organic coconut flour to the oat flour.

Like I said, simple ingredients that ADD the flavor, so you don’t have to! Better yet, these are moist and chewy, the way a muffin should be.


Banana Bread Muffie CupsSnapseed (2)

Makes 8-10 muffins


Ingredients:

  • 1 C. Oat flour
  • 2 TBSP. Coconut flour
  • 1 mashed banana
  • 1 flax egg (1 TBSP. ground flax, 2 TBSP. water)
  • 4 TBSP. Coconut oil (melted, 1 TBSP. used to grease pan)
  • 2 TBSP. honey or pure maple syrup
  • 1 tsp. baking soda
  • 1 1/2 tsp. baking powder
  • Dash of cinnamon and salt
  • 2/3 C. nut milk ( I used Califia Farms)

Instructions:

  1. Preheat oven to 325 degrees F
  2. Combine the flax mixture together and let sit until the other ingredients have been added.
  3. Mash your banana in a bowl with a fork
  4. Add both flours, baking soda and powder, cinnamon and salt to the banana. Stir until just mixed.
  5. Now add your coconut oil, sweetener, flax egg, and nut milk of choice. Mix the ingredients together until you get a thick, creamy consistency.
  6. Use 1 TBSP. coconut oil to grease your muffin tin. Fill each cup 2/3 the way up, leaving space for them to grow a little.
  7. Place the muffins in the oven and bake for 20-25 minutes. After 20 minutes, take them out to check, and if needed, add the five minutes on.
  8. Let cool for 10 minutes, and then enjoy!
Processed with VSCOcam with c1 preset
I ate mine with homemade breakfast quinoa!


Chocolate Coconut No Bake Bites

Prepping has created many random things in my kitchen.

It’s a Sunday, so you’ll find me in the kitchen going crazy; cooking things from acorn squash to muffins to chickpea salads for my week ahead. I’ve been doing this for a few weeks as a New Year type thing, and honestly it’s been so awesome being able to have a stress free week.  

This also leads to some experimenting. As many know, I’m a pretty avid Instagram user, and I am constantly seeing people grab no bake bites as a quick snack.

You should know that I am a HUGE nut butter person. Slightly obsessed, I can probably use it for anything under the sun. So when I’m trying to use up a jar or two, a new recipe is just what I’m lookin’ for!

 Another not so guilty pleasure of mine? Coconut. Some people don’t enjoy it- but give me coconut and nut butter- and you’ve one happy Foodie!

As you can probably tell, this recipe requires some coconut butter. If you aren’t into the flavor, just sub out for more peanut butter.

This is a small batch because I was testing… so add more or less, to create an even bigger, filling snack. And don’t feel obligated to do chocolate peanut butter either! Any nut butter should work just fine; just so long as you let me know what YOUR secret is to making some delicious bites! 😉

IMG_3323.JPG


Chocolate Coconut No Bake Bites

makes 7 bites 


  • 1/4 C. Dark chocolate peanut butter (I used Peanutbutter+Co )
  • 2 TBSP Coconut butter ( I used Sweet Spreads)
  • 1/2 C. Dry oats
  • 2 TBSP. Coconut flour
  • 2 Dates
  • 2 TBSP. Water or almond milk
  • 2 TBSP. Chocolate vegan protein (I used Sunwarrior)

  1. Add all ingredients into a food processor or nutri-bullet and let them mix until a thick, consistency.
  2. Move the mixture out of the processor and add to a bowl with a touch more coconut flour to help roll them out.
  3. Roll out the “dough” into evenly separated bite-sized balls.
  4. Chill in the refrigerator and enjoy after an hour!

IMG_0090.JPG


Cocoa Blueberry Smoothie

Another Saturday, another smoothie. That’s just how it goes, I suppose.

Smoothie are possibly one of the greatest breakfast ideas ever created solely for the fact that they contain so many antioxidants, yet, provide such a punch. And they come in such a wide variety that it’s like hey, you want greens? Smoothie. Hey, you want ice cream for breakfast? Throw some nanners in a blender, and BAM! Smoothie.

You want another perk of da smoothie? TOPPINGS. Yes, toppings. I think that’s why I usually opt for the smoothie bowl; just so I can throw everything and it’s mother on there!

IMG_3164.JPG

This morning, I decided that I wanted something slightly different from my regular banana based smoothie. Usually, I’m adding half to a full frozen banana, with vanilla vegan protein and almond milk.

But, it’s the weekend! Why not switch it up when you have an opportunity to make something different than what you usually are cramming into your short weekday mornings?

So here we are. A blueberry spinach smoothie packed with a chocolate flavor that makes you forget you’re downing berries and greens!


Cocoa Blueberry SmoothieIMG_3174.JPG

serves one

prep time: 5 minutes

cook time: 2 minutes


Ingredients:

  • 1 C. frozen blueberries
  • 2 handfuls fresh spinach
  • 1/2-1 scoop chocolate vegan protein (I used Sunwarrior)
  • 1 pitted date
  • 1/3 frozen banana
  • 1/2 crushed ice
  • Splash of nut milk

  1. Throw these ingredients into your blender in the order provided above, let the ingredients blend together until consistency is a thick, creamy one.
  2. Top that baby! I used hemp seeds, goji berries, crunchy organic peanut butter and fresh sliced kiwi.


Banana Pear Green Smoothie

I’ve been seriously addicted to smoothies lately.

Not a joke; I’m finding myself going to bed thinking of random combos to throw into my nutri bullet. I’ve started a pinterest (follow me; shameless plug) page, I’ve scanned the internet for inspiration…

It’s becoming a problem.IMG_8622.JPG

No- actually- it’s not. Smoothies are wonderful and SO. SIMPLE. The thought of my drowsy self throwing some easy ingredients into a cup and having an almost-immediate meal gives me thrills. And this morning, I felt like a green smoothie was the way to go.

I’ve tested some greens here and there, and never was satisfied.. a weird mix of berries, too much spinach or kale.. I thought I lost hope. Until I came home from the gym this bright and shining last day of 2015, and whipped this sucker up.IMG_8620.JPG

The taste is sweet, vanilla packed, and with an added bonus of spinach, you’ve got yourself a whole food meal that can be topped with an assortment of goodies…


Banana Pear Green Smoothie

serves one

Ingredients:

1/3 C. unsweetened nut milk              1 handful crushed ice

3/4 frozen banana                                  1/2 frozen Bartlett pear

Spritz of water                    1/2 scoop vanilla vegan protein (I use Sunwarrior)

Heaping handful organic spinach


IMG_8630.JPG

  1. Chop banana and pear into medium chunks to help blending process.
  2. Add the ingredients to your blender. Start banana, pear, spinach, ice, protein, milk, and then water.
  3. Blend that sucker and top with the goods! I used Siggi’s plain skyr, raw almonds, Nature’s Path granola, and fresh strawberries!